'Pen' Tool Secrets: Anchor Point Lettering Technique

In This Lesson...

  • When Illustrator automatically joins two paths
  • Why keeping paths separate is useful
  • An easy workaround for precision and separation

'Pen' Tool Quirks

For all it's usefulness as a design tool, Adobe Illustrator still has some interesting little quirks that users must figure out how to work around. One of these quirks, involving the 'Pen' tool, used to drive me absolutely nuts. As I've detailed in previous posts I rarely vector trace using a continuous, point-by-point path that travels around the perimeter of a letterform. Instead, I prefer to construct letters in separate parts and combine with the 'Shape Builder' tool. But, working this way lead me to encounter the same problem over and over. Take a look...
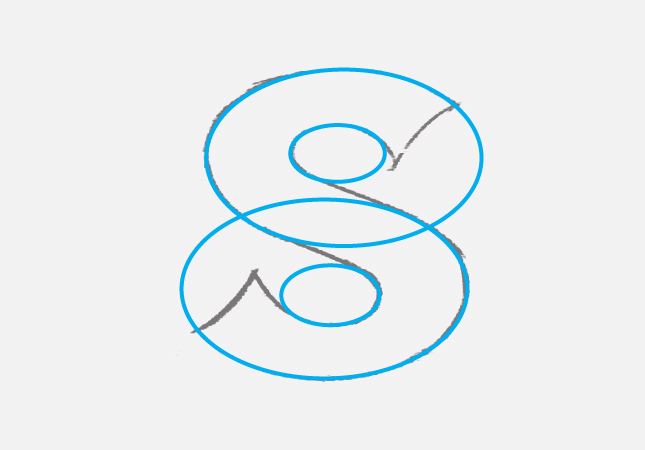


Keep Paths Separate

See the problem? It's subtle but annoying. When using the 'Pen' tool to start a new path at the end anchor point of an existing path, Illustrator automatically joins the two. Quite often this is a useful feature, but there are times when keeping paths separate is highly beneficial for editing purposes and/or reusing segments of paths on similarly shaped letterforms. So, is there a work around? You bet!
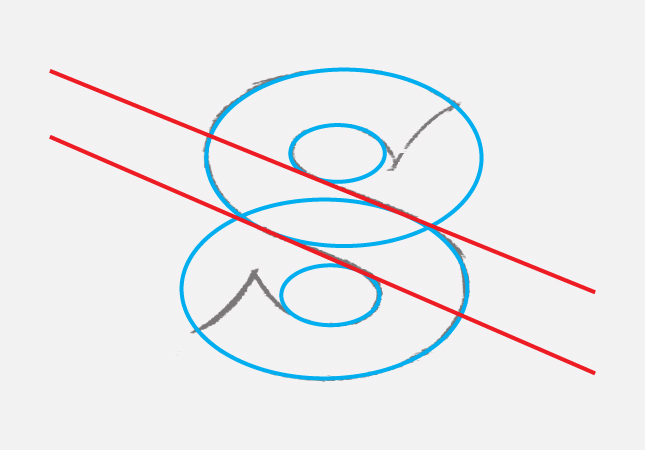
Click. Space. Drag.


How did I do that? Unlike some workarounds, this technique is oh-so-easy: (You'll need to have Smart Guides turned on in order for this to work.)

  1. Using the 'Pen' tool, click the start of a new path near, but not on, the end anchor point of an existing path.
  2. Keep the mouse button pressed down.
  3. Press the Spacebar and drag the newly created point to the end anchor point of the existing path you wish to start from.
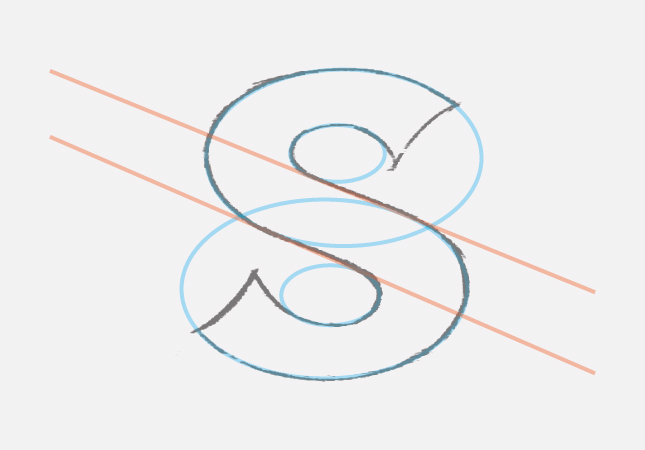
  4. Let go of the Spacebar and drag the Bezier Handles any direction you choose.

There you have it...a quick and easy way to achieve precision anchor point placement while maintaining two separate paths!

Next Time on Type Builder

Next time around, I'll introduce an obscure little tool for connecting paths. It might seem a bit strange, but for the vector lettering artist, it's a handy little gem packed with time-saving, accuracy-improving functionality.


Remove Serifs, Add Style

In This Lesson...

  • First add, then subtract
  • Serif considerations
  • Creating sans serif letters from serif style type

Reverse Method

Last week I presented a nifty way to add serifs to sans serif type. Well, this week I'll show a similar process, only we'll be subtracting serifs to create elegant, custom made, sans serif letterforms.

Be Careful!

Before I begin, a quick word of caution. Removing serifs is a trickier game than adding them. Type with serifs has been thoughtfully designed, so simply hacking serifs off without careful consideration is unlikely to end well. Think about the style/mood you're trying to achieve, and choose a typeface carefully. As always, don't be afraid to draw and edit a ton BEFORE moving on to your vector trace!

Chop n' Trim

The steps that follow are nearly identical to last week's lesson, but there are a few key differences to note along the way:

STEP 1: CHOOSE A SERIF TYPE STYLE

  • I've chosen a typeface called Big Caslon Medium because it's got a nice mix of thick and thin strokes and wide, sweeping serifs that should be somewhat challenging to remove.
  • After you choose a typeface, type a word in Illustrator (or any other graphics software), and set the color to a light/middle gray value.

STEP 2: PRINT

  • Print out a copy of your word on cheap, 8.5" x 11" paper.
  • If you have a light table and tracing paper, use 'em. If not, you can draw directly on top of your printout, but I'd recommend printing a few extra copies.

STEP 3: DRAW

  • Now for the fun part. Use the serif typeface you selected as the bones for your hand lettering, and experiment with removing and/or reshaping the serifs.
  • Remember, the type you selected is merely a skeleton at this point. Don't hesitate to redraw entire sections of a letter to fit the style you're trying to achieve.

STEP 4: SCAN

  • Scan or photograph your new, custom lettering and place it onto a locked layer in Adobe Illustrator.

STEP 5: TRACE & REFINE

  • Create a new layer and put your vector skills to work by tracing your sketch.
  • When you finish, you'll have designed custom, sans serif lettering that you can't find anywhere else!

Next Time on Type Builder

The 'InkScribe' tool from Astute Graphics is one of my absolute must have tools. Sure, I could find a way to get along without it, but it'd be a huge blow to my workflow. The reason? Find out next week in Part 1 of a two part series dedicated to one of the most useful tool features in all of Adobe Illustrator.


Drawing Custom Serifs on Sans Serif Letters

In This Lesson...

  • When originality is unoriginal
  • The inspiration of Frankentype
  • How to draw serifs on sans serif type

Mr. Originality

For the longest time, I was convinced that my custom type needed to be 100% original, wrought from the inner sanctum of my creative being. But after awhile, I noticed something: All of my hand lettering was beginning to have the same look and feel. The reason was simple: My feeble little mind can only create so much on it's own. At some point, like all artists, designers, and illustrators, I was going to have to access reference material to expand my horizon of possibilities and replenish my creative thinking abilities.

Frankentype!

Then, one day I had the thought, "What if I just Frankenstiened an existing typeface?" So, I typed a word in Helvetica, printed it out, taped the print to my LightTracer 2, slapped a piece of tracing paper on top, and went to town! When I finished, I was pleasantly surprised by what I'd drawn. My lettering had the bones of Helvetica, but the style, the flesh and blood, was an entirely original creation. Excitement!

Super Simple Sassy Serifs

In today's lesson, I'll provide a quick breakdown that explains how to add custom serifs to an everyday, sans serif typeface, and I think you'll be encouraged by the versatility this simple technique adds to your type game.

STEP 1: CHOOSE A SANS SERIF TYPEFACE

  • I've chosen the typeface DIN Condensed Bold for its height, weight, and clean/modern construction.
  • After you choose a typeface, type a word in Illustrator (or any other graphics software), and set the color to a light/middle gray value.

STEP 2: PRINT

  • Print out a copy of your word on cheap, 8.5" x 11" paper.
  • If you have a light table and tracing paper, use 'em. If not, you can draw directly on top of your printout, but I'd recommend printing a few extra copies.

STEP 3: DRAW

  • Now for the fun part. Use the sans serif typeface you selected as the bones for your hand lettering, and experiment with all kinds of fancy schmancy serif styles.

STEP 4: SCAN

  • Scan or photograph your new, custom lettering and place it onto a locked layer in Adobe Illustrator.

STEP 5: TRACE & REFINE

  • Create a new layer and put your vector skills to work by tracing your sketch.
  • When you finish, you'll have successfully performed type surgery and created custom, serif lettering that you can't find anywhere else!

Next Time on Type Builder

This week I showed you how to draw super simple sassy serifs onto an existing sans serif typeface. Next week, I'm headed in reverse, as in removing serifs to create to a funky sans serif type specimen!


Custom Shadow Textures in Illustrator

In This Lesson...

  • Updated lesson plan
  • An easy way to make your custom lettering stand out
  • Shadow texture breakdown

A Change of Plans

At the end of the last Type Builder lesson, I hinted at introducing a tool for hand lettering on the fly in Adobe Illustrator. I was referring to the 'Blob Brush' tool, but after some initial planning for the post, I decided to delay the 'Blob Brush' breakdown because the lesson was becoming a bit more complicated than I'd hoped for.

Custom Shadow Textures

With that out of the way, allow me to introduce today's topic: How to make custom shadow textures for your type in Illustrator!

The process for making custom shadow textures is simple, but it's a high impact effect that's certain to add a touch of class to your vector lettering.

In this lesson I'll lay out a quick, step-by-step guide then provide a few examples of custom made shadow textures to get your creative wheels turning.

Follow Along!

For this breakdown, I'll be using a typeface I designed called BoHammer Script, but your own vector lettering samples (along with typefaces from your Illustrator library) will work just as well.

Here we go!

STEP 1

  • Create two layers in Illustrator: Type Layer and Shadow Layer.

STEP 2

  • Type Layer will have the word you're using. Select the word, then copy and paste in place on the Shadow Layer.
  • Next, make the word a compound path and lock the Shadow Layer.

STEP 3

  • Now, select your word in the Type Layer and perform an offset path from the 'Object' dropdown menu (play with the offset amount to find your desired effect).
  • Copy the newly offset letters, delete, paste in back, group, and change the color to match the composition's background.
  • Then, lock the Type Layer.

STEP 4

  • Unlock the Shadow Layer, select your word, and position to your liking.
  • This will give you your first look at how the shadow will appear.

STEP 5

  • Now it's time to create the texture for your shadow. For this example, I'll be making a crosshatching texture.
  • The opportunities for textures and patterns are endless.

STEP 6

  • Working in the Shadow Layer, I'll draw a diagonal line at 45 degrees somewhere on the artboard.
  • Then, I'll copy and paste a new line and drag it to the other side of the artboard.
  • Shift-select the original line, and create a 'Blend' between the two.

STEP 7

  • To achieve the crosshatching look, simply copy the blend, paste in place, and reflect vertically.
  • Then, select both blends, group, copy, delete, and paste in back.

STEP 8

  • Now position the crosshatching texture behind the shadow word.
  • Select both, right click, and choose 'Make Clipping Mask.'

STEP 9

  • Congrats! You just custom built a one of a kind shadow texture for your lettering.

VIDEO

If you're more of a visual learner, here's a quick video that shows the whole process from start to finish:


EXAMPLES

Finally, here are a few more examples to help inspire some creative thinking:

Next Time on Type Builder

Did you know that you can use an existing typeface as a guide for your hand lettering? In the next lesson I'll explain how I draw serifs on top of sans-serif type to create beautiful, custom letterforms.

PS...Sign up below to have Type Builder delivered directly to your inbox!


Brush Pen Lettering for Adobe Illustrator

In This Lesson...

  • The popularity of brush pen lettering
  • A reminder about practice
  • How to turn your crappy brush pen lettering into beautiful client work

Brushy & Beautiful

Every time I'm on Instagram, I see tons of amazing posts featuring brush pen lettering work. The level of talent is inspiring, and I love seeing more people exploring the incredible creative capabilities of pen and paper. That being said, if you ever actually pick up a brush pen and put it to use, you'll soon find that it takes serious skill to draw beautiful letterforms with the flick of a wrist.

Brushy & Blah

If your brush pen lettering stinks (as mine often does), there's only one way to see improvement - PRACTICE! Like any artistic skill worth having, it takes time to develop command, but eventually you'll see positive results. In the meantime I have a wild suggestion: Even if you're not very good, use brush pen lettering in your client work! Don't worry, I'm not trying to derail your design career.

Brushy & Benjamin$

As I mentioned earlier, my own brush pen lettering isn't too hot, but I still use it in my client work because it provides character and freedom of expression that ready-made fonts often fail to deliver...plus it's easy! Here's how I use it:

DRAW

  • Using a light colored marker with a brush nib, draw a word using whatever style suits you.

REFINE

  • Refine your letters with a pencil directly on top of the brush pen markings. (One of the perks of using a brush pen is that the thickness of your letters should be relatively consistent throughout.)

SCAN

  • Scan or photograph your lettering, and place it on a locked layer in Adobe Illustrator.

TRACE

  • It's showtime! When you finish this step, you'll have a 100% custom set of letters that will make your clients beam!

As you can see, using your brush pen lettering is a straightforward process that yields one-of-a-kind results. Using it for client work is a great way to build confidence in your hand lettering, and it gives you the opportunity to further practice vector tracing.

Next Time on Type Builder

Adobe Illustrator's 'Pencil' tool is an overlooked vector lettering hero. On the next Type Builder, I'll show how I use the 'Pencil' tool to achieve clean letters with a loose, handmade feel.

PS...Sign up below to have Type Builder delivered directly to your inbox!


Vector Trace the Letter 'S' with Confidence

In This Lesson...

  • The pitfalls of freestyle 'Pen' tracing
  • A simple, geometric setup for 'S' tracing
  • The Invisible 8
  • Bonus Tip

That Dreaded 'S'

The first time I tried vector tracing my hand lettering in Adobe Illustrator was for local salon logo. The whole thing was a mess, but the 'S' in 'Salon' was particularly atrocious. It took some time, but eventually I discovered that there are two basic options for tracing an 'S' in Illustrator:

  1. A freestyle trace with the 'Pen' tool
  2. A trace guided by a simple, geometric setup

These days, I routinely combine the two options, but when I was still struggling with my vector tracing skills, I leaned heavily on the guided, geometric setup. Freestyle tracing with the 'Pen' tool almost always lead to inconsistent letter thickness, flat spots on curves, and generally awkward results. With time, practice, and an understanding of the basic 'S' geometry, these issues eventually gave way to clean curves traced quickly and confidently.

The Invisible 8

I use a method that I call the Invisible 8. It's a great technique if you're new to vector lettering. Use it as a guide for the actual trace of your 'S' or reference it as a way to improve your hand lettering. Here's how the Invisible 8 works in Adobe Illustrator:

1. Sketch an 'S' and place into a locked layer at 20% opacity.

2. On a new layer, create your Invisible 8 using the 'Ellipse' tool.

3. Add two lines that define the 'S' spine. (Allow your lettering sketch and designer's eye to define the angle of these lines.)

4. Select all your Invisible 8 lines, reduce opacity to 30%, and lock the layer.

5. Use the Invisible 8 to guide the tracing of your 'S' on a new layer. (**Bonus** Use the Invisible 8 plus pre-mapped anchor points for even more precision.)

Next Time on Type Builder

On the next installment of Type Builder, I'll be introducing something that absolutely every vector letterer should be using: The 'Shape Builder' tool.

PS...I just created the Type Builder newsletter. Sign up below to have Type Builder delivered directly to your inbox!


Why I Use Lined Paper for Hand Lettering

In This Lesson...

  • Why your hand lettering doesn't need to be perfect
  • How lined paper aids vector tracing in Adobe Illustrator
  • Different types of lined paper and a few recommendations

Functional Lettering

If your goal is to create clean, beautiful vector lettering in Adobe Illustrator, then there's something you should know. Your hand lettering sketches, those highly crafted, intricately detailed works of art that flow from your pen, don't need to be perfect! But they do need to be functional.

The vector tracing tools available in Illustrator are instruments of extreme precision that can help you easily correct any inconsistencies in your hand lettering. The goal in creating a sketch for trace is to strike a balance between having enough visual info to actually realize your vision and spending too much time on details that you can more easily correct in Illustrator. One of the best tricks I've found to help accomplish this is the use of lined paper.

Lined paper is great because:

  1. The evenly spaced lines help you make letters that are proportional to one another.
  2. It helps establish consistent placement of details, embellishments, and serifs.
  3. It acts as a built in set of guides that you can reference while you vector trace.

Lined Paper Preferences

So what kind of lined paper should you use? The kind that works best for you. You can even make your own custom lined paper. Here's what I use:

The Legal Pad

  • This is my favorite type of lined paper for lettering. It's visually simple, inexpensive, and feels soft underneath my pen. I typically use a legal pad for more ornate hand lettering.

Grid Paper

  • I like to use grid lines to create clean, structured type. It's especially useful for designing logotypes and monograms where those little geometric details and size relationships make all the difference.

Elementary Ruled

  • If you like using ink brushes to create scripts, then you know how hard it can be to achieve consistency due to their curvy, flowing nature. Ementary ruled paper (which is meant to aid youngsters in penmanship) is a great practice tool and confidence builder, and its differing line styles help create size distinctions when vector tracing.

Next Time on Type Builder...

If vector tracing the letter 'S' has ever driven you to the edge of insanity, then visit Type Builder next Tuesday (12/29) to learn a simple construction technique that is sure to renew your confidence.

PS...I just created the Type Builder newsletter. Sign up below to have Type Builder delivered directly to your inbox!


A Timely Tip for Illustrator's Rotate Tool

In This Lesson...

  • Why you should use Adobe Illustrator's 'Rotate' tool
  • How to rotate around a manually selected reference point
  • Using the 'Selection' tool to rotate with confidence

Rotational Excellence

If you're a pro at using Adobe Illustrator to vector trace your hand lettering, then this lesson might be obvious to you. But you know what, it's so dang useful that I'll go ahead and risk your boredom.

When I'm vector tracing my hand lettering and I need to rotate something, I prefer to use the actual 'Rotate' tool (hotkey 'R') so that I don't risk accidentally scaling, skewing, or moving the shape or path I'm working with. My favorite 'Rotate' tool feature is the ability to manually select the rotation/reference point. Why is this so useful?

  1. It allows for extreme precision, especially when used with Smart Guides.
  2. It saves a ton of time.
    • When I was first starting out, I spent close to a year rotating every object from its center point. Rotate, reposition. Rotate, reposition. Over and over...

The 'How'

How exactly do you manually select the rotation point when using the 'Rotate' tool? It's easy!

  1. Select the object(s) you'd like to rotate.
  2. Pick the 'Rotate' tool or press 'R'.
  3. Click the point you want your object(s) to rotate around.
  4. Bada bing!

A similar method that involves the 'Selection' tool may come in handy when rotating circles, ellipses, and irregular shapes and paths:

  1. Select the object(s) you'd like to rotate.
  2. Click on the 'Selection' tool or press 'V'.
  3. Select the reference point you'd like to use from the 9-box grid located in the 'Transform' panel.
  4. Choose a corner of the 'Bounding Box' surrounding your object(s) and rotate away!

Next Time on Type Builder...

On the next Type Builder, I'll encourage you to revisit your 'wide-ruled' past and discuss how using lined paper for your hand lettering gives you a leg up when it comes to vector tracing in Adobe Illustrator.